
Photographing memories has become a massive part of our lives; from personal to professional life, we tend to capture pictures for various reasons. While taking photos, we don’t seem to give much attention to the angles or the overall result, which increases the chances of blurry images. Images usually get blurred when the focus is not set accurately, or the lenses are uncleaned, and so on, so how to fix blurry pictures? In this article, we’ll introduce a helpful online and offline tool that can repair photos for you named Repairit.
Part 1: What Causes the Photos to Get Blurry?
If you’ve recently encountered a scenario where your beautiful photography session has got ruined because of some problematic blurry images, you must be wondering how to remedy this issue. Blurry pictures usually occur if the device you’re using to capture photos has a slow shutter or doesn’t have clear lenses. If your camera or phone has poor focus, it can severely affect the quality of photos, especially if the images are from afar. Besides the camera’s movement, the movement of the subject you’re capturing can also ruin the perfect shot.

Unlike advanced digital cameras, other devices have an issue with slow shutter speed, which can easily ruin the result of your stunning captured photo to nothing but a blurry picture. Another thing that can blur your images is not using a tripod. Tripod usually comes in handy when you’re a professional photographer or a blogger, as it can provide good coverage for your photos which can’t be done usually. Even though getting blurry photos after a hectic photography session is more stressful than ever, it can be undone with the help of a few tips and tools.
Part 2: How to Fix Blurry Photos Online with a Secure Environment?
Now that we’re aware of the reasons that can lead to blurring your photos, let’s jump on the discussion on how to fix blurry pictures. Countless photo repair tools are Roaming online, by which you can quickly improve your blurry photos. Wondershare Repairit Photo Repair Online is one tool that allows you to correct your photos regardless of the issue without compromising on the original quality or privacy. You only require to upload the image you want to fix, and this efficient tool will repair it within seconds.
Repairit Online lets you fix photos of up to 500 MB, and it has an efficient privacy system that removes the repaired pictures from its website after 3 hours. With the easy-to-navigate interface, Repairit Online offers to fix 100 photos per day, and it supports popular photo formats, including JPG, CR2, JPEG, and NEF. The well-efficient system lets you repair blurry photos from Mac & Windows hard drives, USB drives, memory sticks, SD cards, and digital cameras. Now let’s move forward to the steps on how you can repair your blurry photos on Repairit Online:
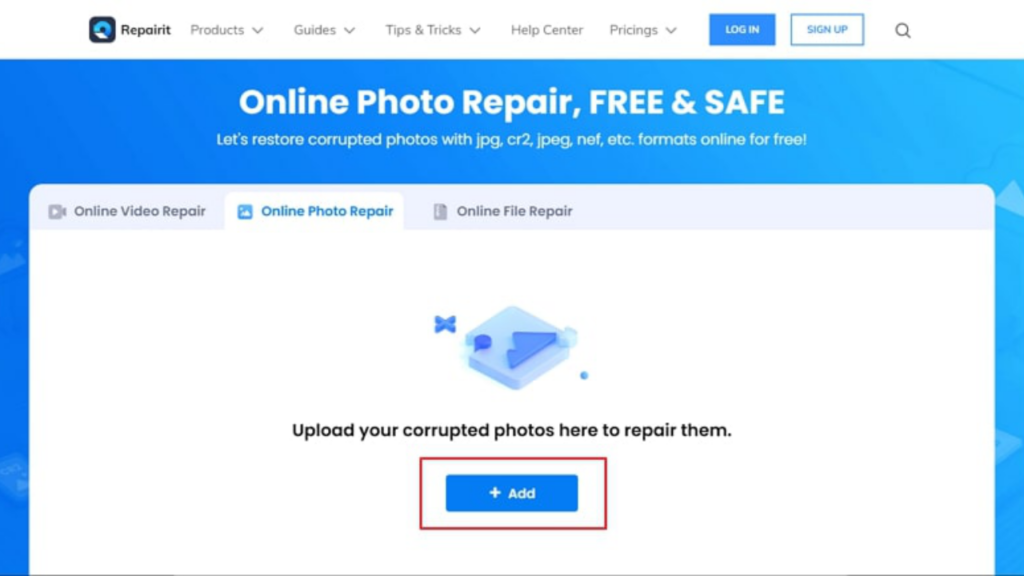
Step 1: Upload the Blurry Photo(s)
First, you must upload the blurry photos you want to fix on Repairit Online by clicking on the “Add” button with the + sign. You can as well drag the image into the operating area. Once the photo(s) are uploaded, you’ll be able to see the information related to each photo, such as file name, size, and format, on the interface.
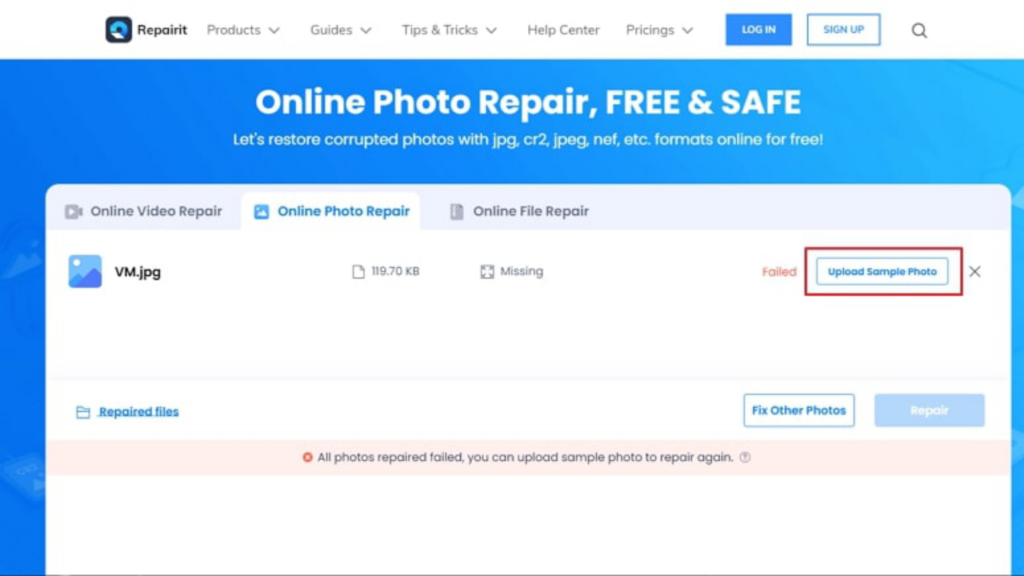
Step 2: Start Fixing the Photos
You can start the repair process by clicking on the “Repair” button in the lower right corner. Now, wait for a few seconds for the repair to complete. Once all photos are fixed, you can preview the images (s) to ensure the repairing process is up to the mark. But if the repair process isn’t successful, you need to move to Advanced Repair mode. Click on the “Upload Sample Photo” and upload the photo captured from the same device as the blurry image. Then click on “Repair” to start repairing photo(s) with the advanced mode.
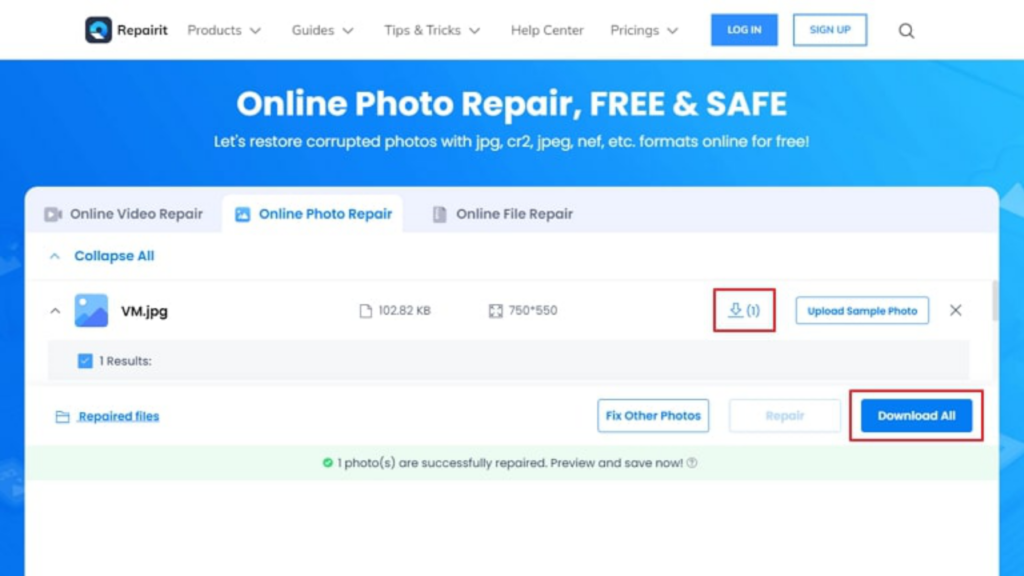
Step 3: Finally, Preview and Save Fixed Photos
When you’re done repairing photos, you can use the preview feature to preview the fixed photos to determine if the repair was according to your needs. To preview, check the “Results” to start previewing pictures, and once you’re satisfied with the result, hit on the “Download” button with a down arrow to save the photo(s) on your computer. You can also select “Download All” to download all the repaired images.
Part 3: How to Fix Blurry Large Size Blurry Photos Simultaneously?
For instance, you want to repair photos that exceed the 500 MB limit or if you have an issue with an unstable internet connection. Hence, Wondershare also offers a desktop version of Repairit, and this software provides the same valuable features as the online version. Suitable? For the ease of its users, it supports popular formats like JPEG, PNG, JPG, CR3, CR2, NEF, NRW, RAF, DNG, ARW, GPR, TIF, TIFF, CRW, GIF, SR2, and ORF.
It offers standard and advanced modes and can repair your blurry photo(s) in three simple steps. Repairit, a photo repair tool, is well-known for its easy-to-handle interface that lets you repair your photos regardless of the issue. Now that we know plenty about this desktop version of Repairit, let’s guide you through its steps to fix blurry photos:
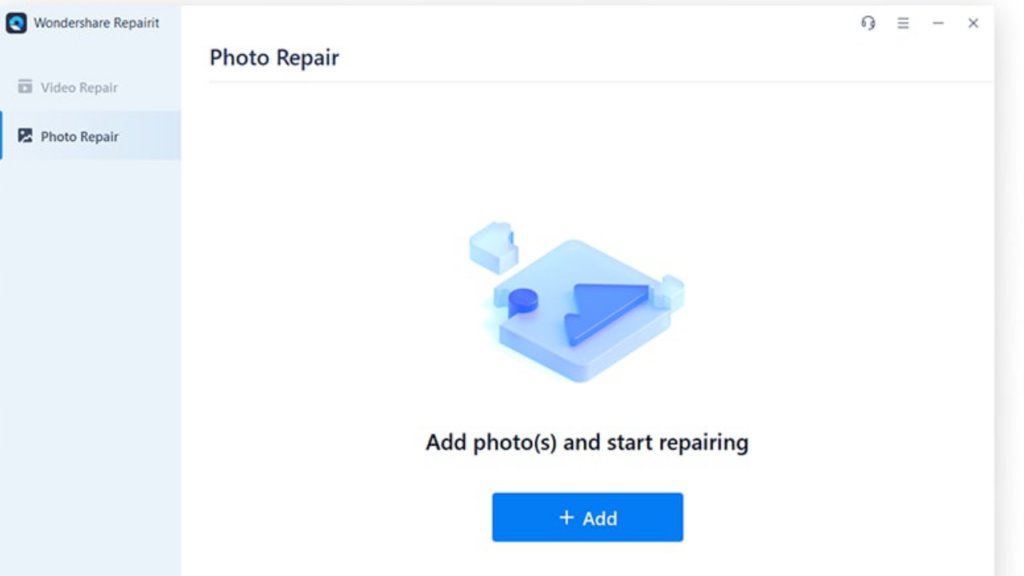
Step 1: Launch and Import the Blurry Photo(s)
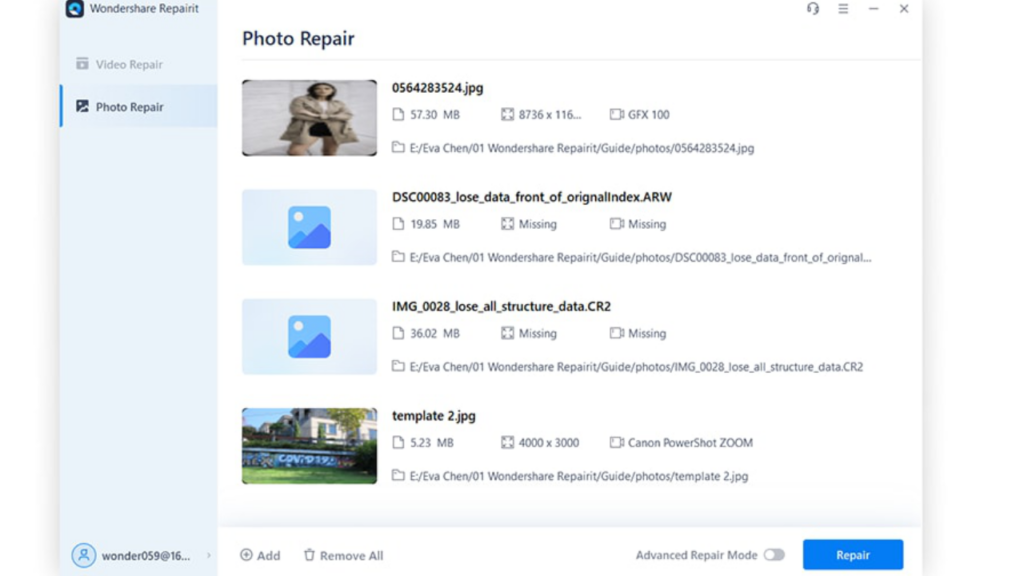
Successfully download and launch Wondershare Repairit on your computer. Now, Choose the “Photo Repair” tab from the left bar from the default setup. Then click the “Add” button, and a small window will appear on the desktop. Select the photo(s) you want to fix from where they were initially saved. Once images are successfully imported, you can see their basic info on the interface.
Step 2: Repair the Selected Photos
Now start the repairing process by clicking on the “Repair” button, and wait for some time for the repair to complete. Once the repair is done, you’ll see the pop-up window on the screen. If the repair isn’t successful, you could always move to advance mode. Click on the “Advance Repair Mode” from the bottom of the screen. Then add the sample photo captured from the same device as the blurry one. Finally, click the “Repair” button to start the advanced repair. It might take a while if the big-size photos are repaired.
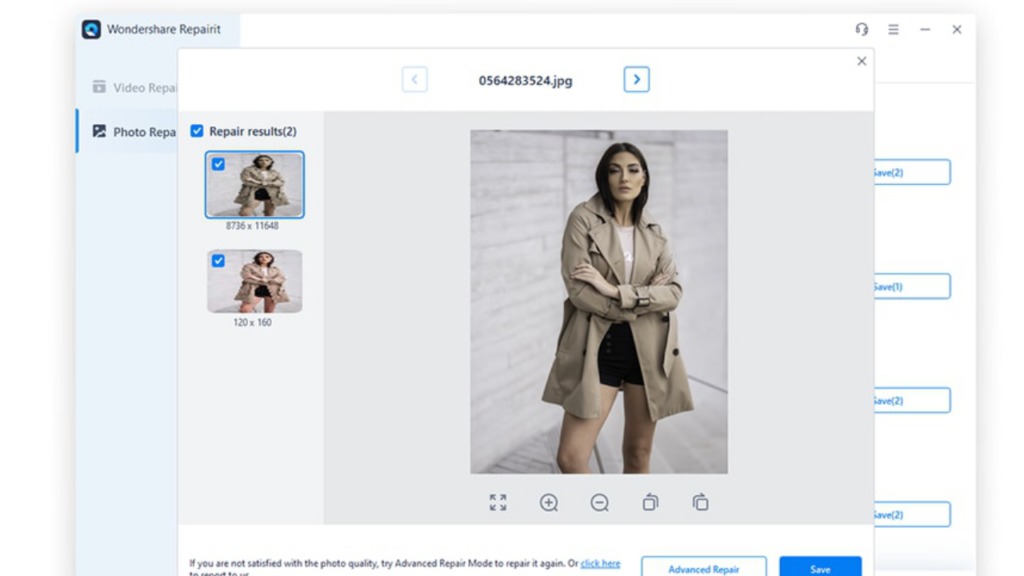
Step 3: Preview and Save
Once the repair is completed, you can preview the photos to make sure your photos are fixed. After being satisfied with the repair, you can save the images on your computer by clicking the “Save” or “Save All” button.
Conclusion
Wondershare offers online and desktop versions of its photo repairing tool by which you can quickly fix your blurry photos on the go. The easy and eye-catching interface and design make your photo repairing process simple, all while keeping your privacy secure. The valuable features such as preview and batch repairing make this tool one of the best contenders. So now you know the answer to how to fix blurry pictures, right?