
Gone are the days when you have to stay in a long queue to get your ticket booked. Today, you can do the same anytime and anywhere using your mobile phone.
One has to visit IRCTC website which is available on mobile through three different mobile apps – Paymate, NGPay and ATOM to book railway tickets. We have chosen ATOM as it is available on Android and has application for all the major mobile platforms and works even on most feature phones.
Android users can go to Android Market on their device, search for ATOM, find and download it. Other can search it in independent stores like Getjar.
Step 1
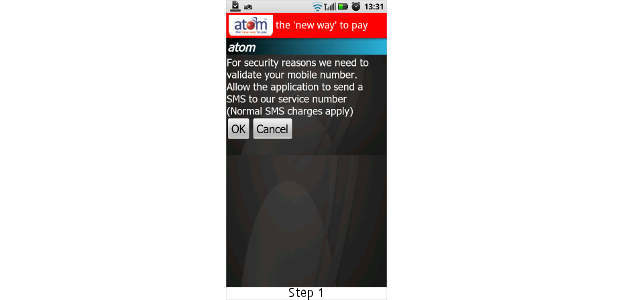
The App once downloaded will ask you to register by first verifying your mobile number. It will seek permission to do so, allow it.
Step 2
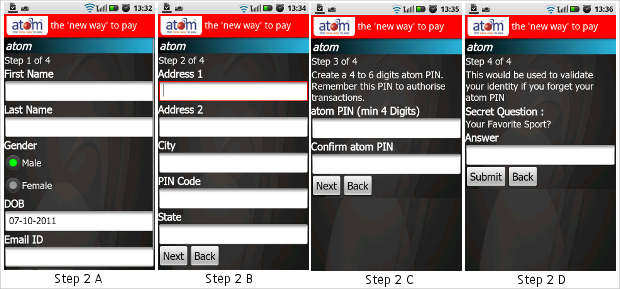
The app will then ask you to fill up the form asking your name, gender, email id, date of birth and address. This will be followed by keying your choice of a four to six digit PIN, which you need to enter twice (the same PIN). This will be your PIN (password) for all future transactions.
Also it will ask you for a security answer, which can be used in future in case you forget your password. Provide these details properly as this will be used while you book tickets or do any other transactions.
Step 3
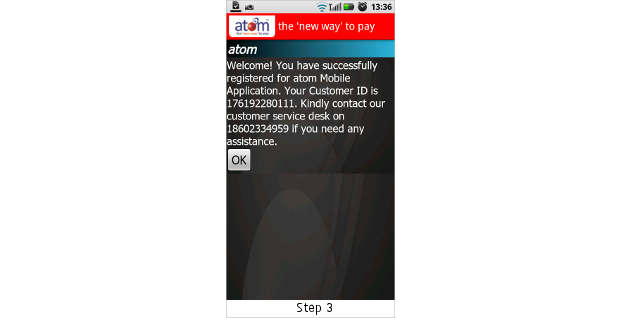
After successful registration, a page will appear showing your (customer) ID. Please note it down somewhere. It will also give you a customer care number, which you can contact in case of any confusion. Press the ‘OK’ button which will then take you to the homepage of the app.
Step 4
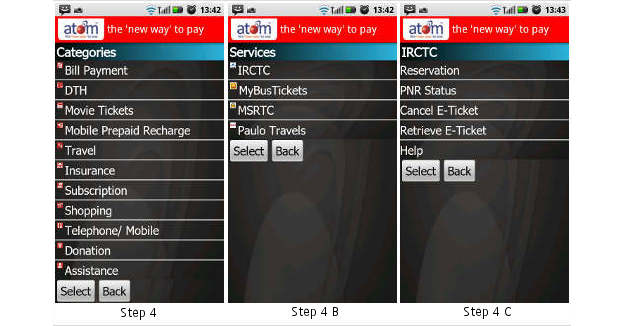
There are several things that you can do through this app including bill payment, DTH recharge, buy movie ticket, recharge prepaid mobile, pay insurance premium, shop etc.
Step 4 B
When you open the app each of these categories is listed. For ticket booking, you need to click on ‘services’ and then ‘Travel’. This will give you four options, choose IRCTC. You can also book bus ticket, air tickets if you choose other option.
Step 4 C
Clicking IRCTC will again give you options like reservation, PNR Status, Cancel E-Ticket, and Retrieve e-Ticket and Help.
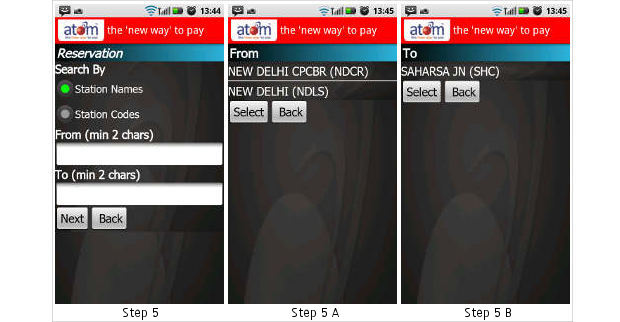
Step 5
To book a ticket, click on ‘Reservation’. The new window will give you option to search by station name or station code. If you know the station codes select ‘search by station code’. If you don’t remember codes, then click on search ‘by station’. Key in the station name in the box provided, even first three letters of the station name will be sufficient.
Step 5 A
Click ‘Next’, a new window with starting station options (based on what you entered will come up), choose the right one for you and click it.
Step 5 B
This will be followed by the ‘to station’ choices, again select the right one.
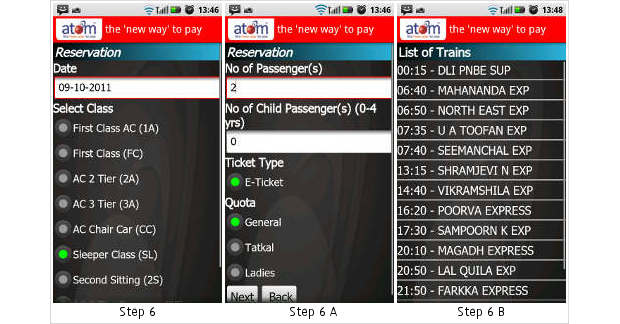
Step 6
Then comes the choice of Class (sleeper, 3rd AC, second AC, Chair car etc), select your choice and click next.
Step 6 A
The second page will ask you for the number of passengers who will be travelling on the particular journey, number of child passengers (0-4 years), ticket type, and quota (general, tatkal for journey within next two days and ladies) and the date of travel. Make your choice by select through the check boxes given alongside the options.
Step 6 B
The next window will give you the list of trains; select the one that you want.
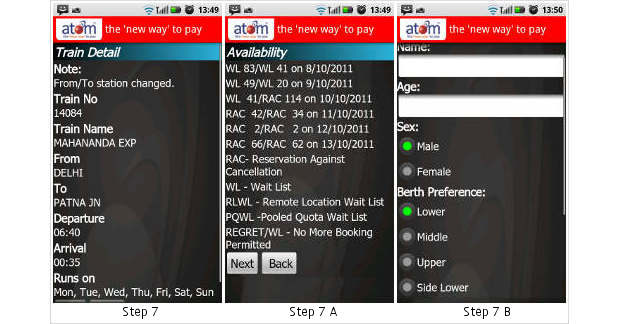
Step 7
After selecting the relevant train, the app will show you the details of the train such as its name, number, from station, To station, date, arrival, departure etc.
Step 7 A
You will now have the availability status on various dates. When you click next, you will again be asked for the journey date, which you can choose based on the availability (if your chosen date was 7th but tickets are available for 9th you can choose 9th).
Step 7 B
In the subsequent page, you will be asked for the details of the passengers like their name, gender, age (the same as in regular web IRCTC).
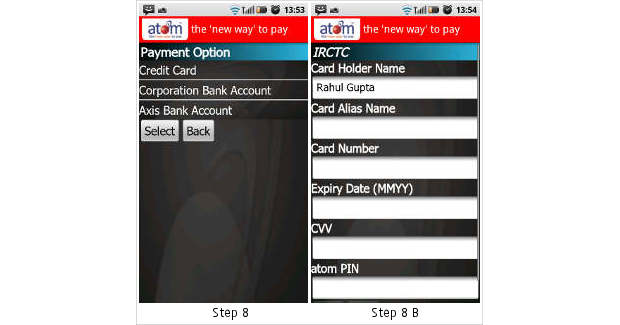
Step 8
After you are done with all this, now is the turn to make the payment. There are three options here namely credit card, Corporation bank, and Axis bank account.
If you are not a customer of these two banks, you should select the credit card option, which works even for the Debit cards.
After selecting the credit card option, the app will ask you to choose between Visa and Master Card (look on your card, you will know).
Step 8 B
The next window will ask you about the card details including your full name (if it is your card). If the card belongs to someone else mention his or her name. Fill in other details like Card number, expiry date (mentioned below the 16 digit card number), CVV which is mentioned on the back side on the right corner of the signature strip (its a 3 digit number) generally accompanied by a 4 digit number that is the last four digits of the card number and also your ATOM PIN (which you generated when registering).
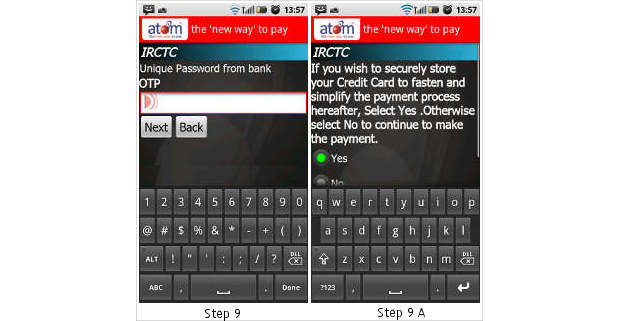
Step 9
The next screen asks for an OTP (one time password) which you will receive from the bank through SMS and email. However, to receive the OTP you need to register your mobile number and email id with your bank.
Step 9 A
Once you key in the OTP, the application will ask you ‘if you want to store the card details with the application’. Now, it depends on you whether you want to save it or not. Remember that even if you save the details of your card, you will still need to key in PIN and OTP every time you transact and therefore it is safe to store the details in your phone. Saving it will make it easy for you to book tickets in subsequent occasions as you will not need to key in the details every time you shop. However, if you have a very easy pin and you keep forgetting your mobile here and there, then you better not save the details.
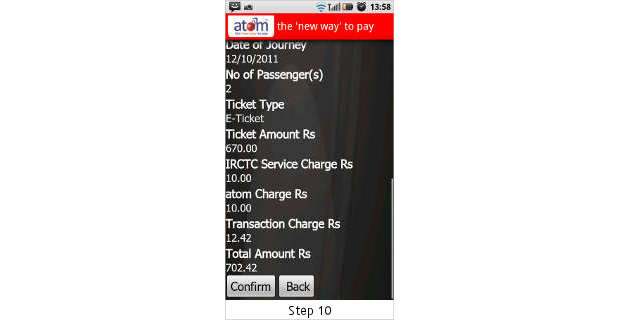
Step 10
Finally, the booking page will appear with all the details of the journey, the price and the availability details. If you don’t need any changes, you can proceed with the payments.
Step 11
The last and final step is to take the printout of the ticket. You can also save the screen shot of the ticket onto your phone as a proof of ticket. You won’t need a printout. If you access your mail through mobile it solves the problem, just show it to the ticket checker along with your ID proof.