
Digitization in India has made inroads much faster than any other country in the word. Last year’s demonetisation helped digital transaction spread all across the country in no time. Being one of the only beneficiaries from this decision, Paytm have managed to hold a strong position in the digital payments industry. However, things might change soon as Google recently launched its new UPI based payments App called – Tez. While we hope this does not end up like Google Allo or Duo, there are a bunch of unique features which has all the potential to be up there with Paytm. If you haven’t tried Google Tez, here is a step-by-step guide on how to use and transact with this new app from Google.
Initial Setup
Step 1: Download the Google Tez app from Playstore or App Store. Irrespective of whether you are on Android or iOS, the app is available on both the platforms for free.
Step 2: Once done, open the app and the first thing it will ask you is your preferred language. Besides English and Hindi, you can choose a bunch of other regional languages such as Bengali, Telugu, Gujarati etc. Tap the arrow placed on the top right corner to proceed.
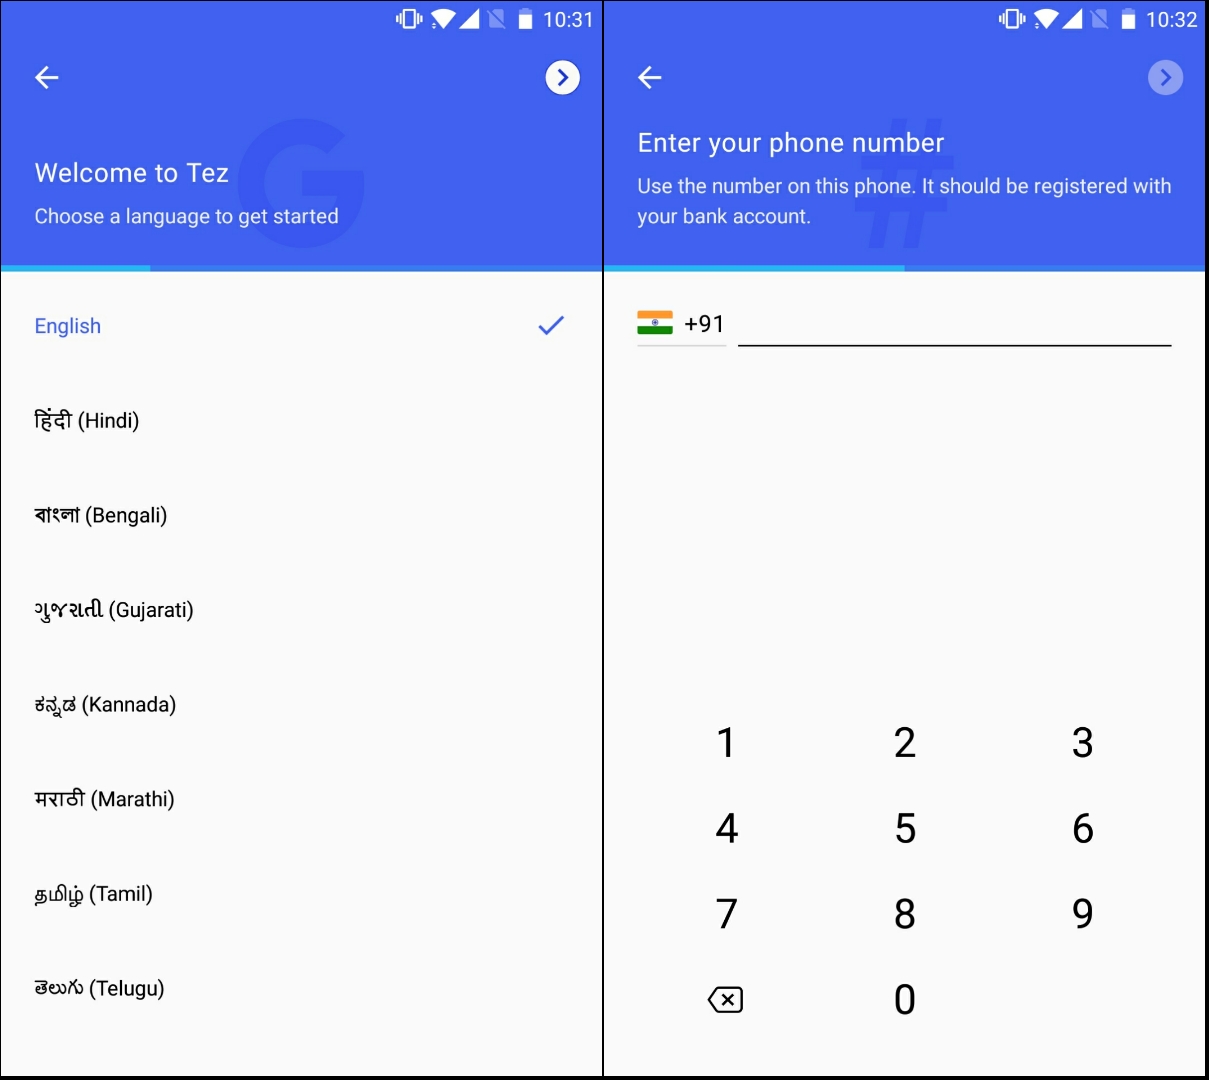
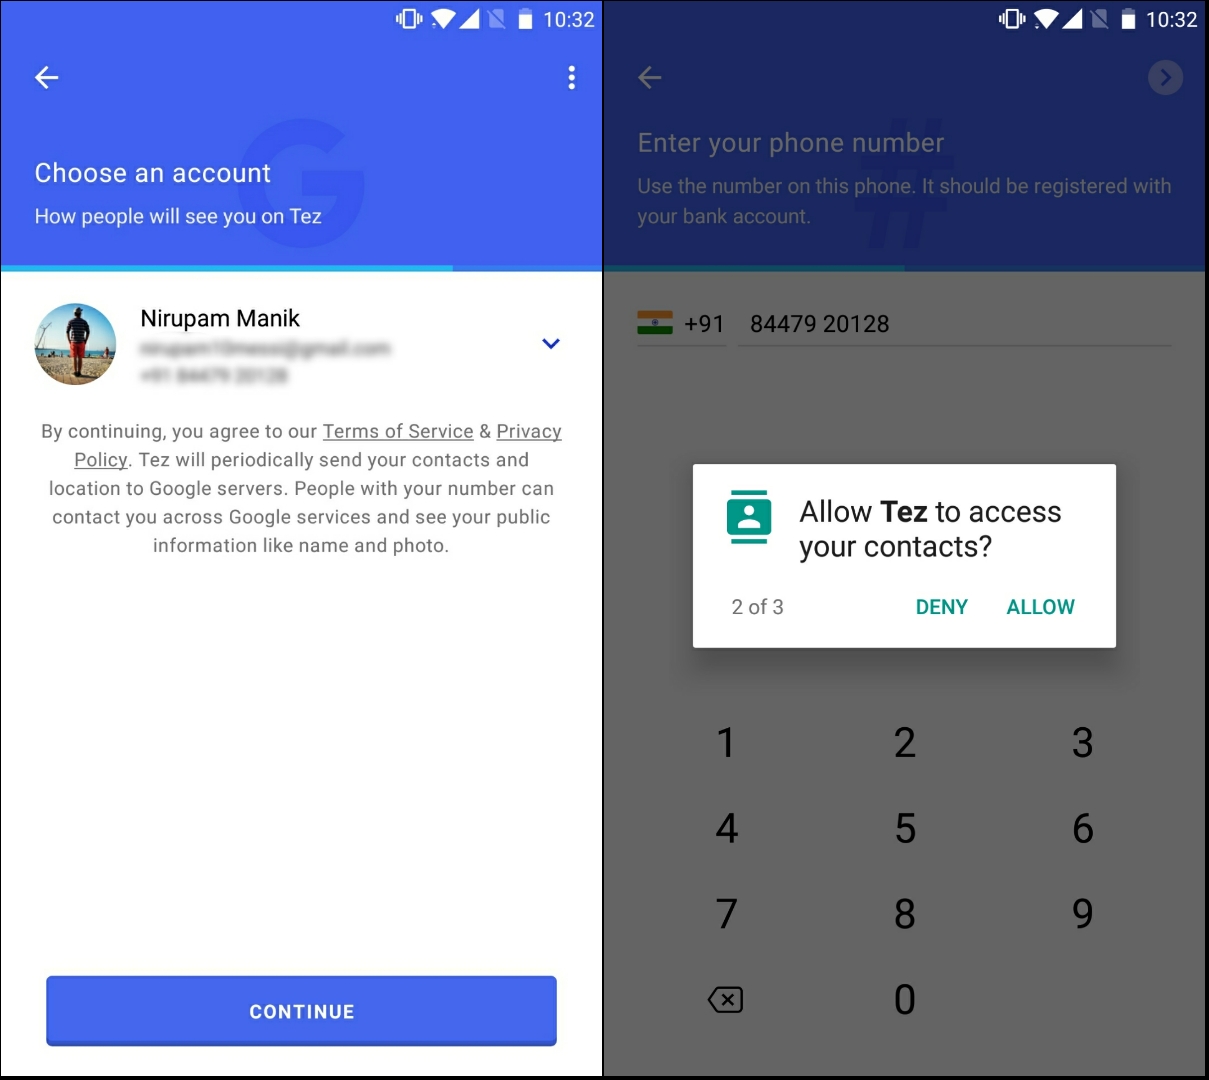
Step 3: Next, you now need to enter your mobile number. Note, this number should be linked to your bank account through which you need to make the transaction.
Step 4: Next, the app will now ask you to choose a Google Account which you want to link to Tez. Further, Allow all the access requests at this moment as the app will now track the OTP verification.
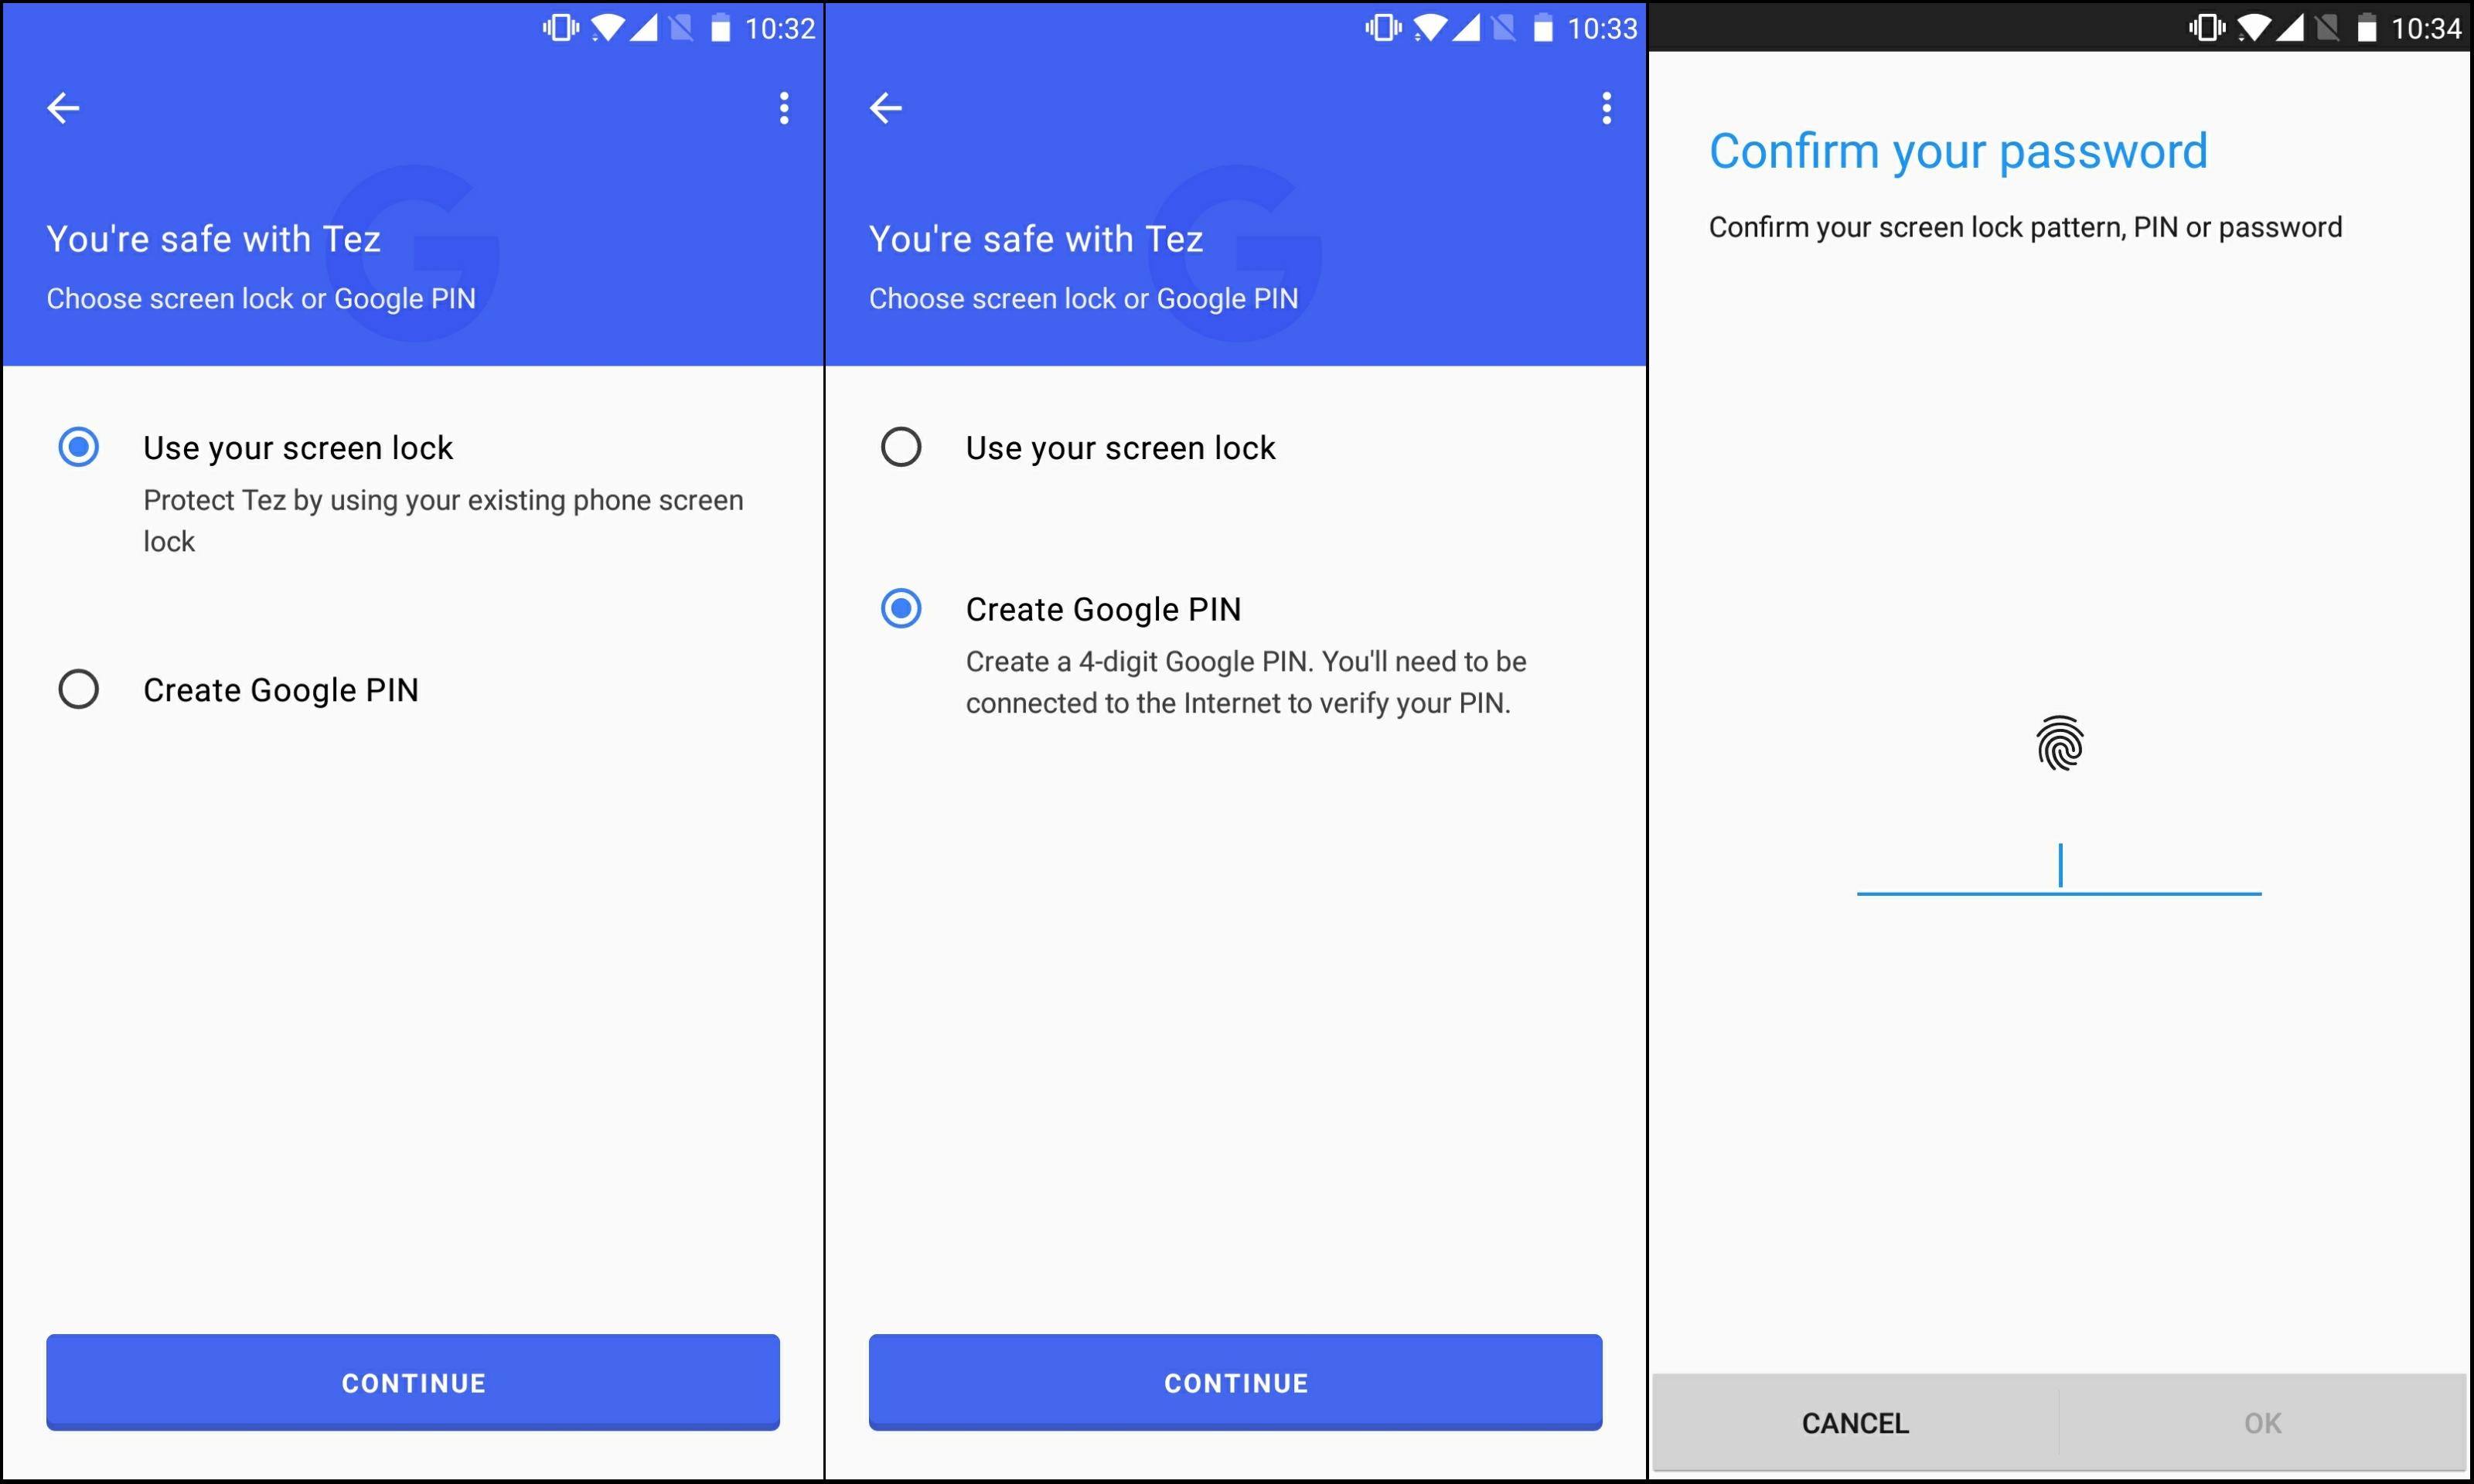
Step 5: After OTP verification, Google Tez will also ask you to either use the device lock for security or create a separate Google PIN for Tez. The device lock worked fine for me as it also gives you an option to unlock via fingerprint.
How to add a Bank Account?
Step 1: After you are done with the initial setup, you will now see ‘Add Bank Account’ located just below your profile name at the top.
Step 2: Google Tez supports all the major banks in India. Choose your bank and select the mobile number to which your account in the above, select bank is linked.
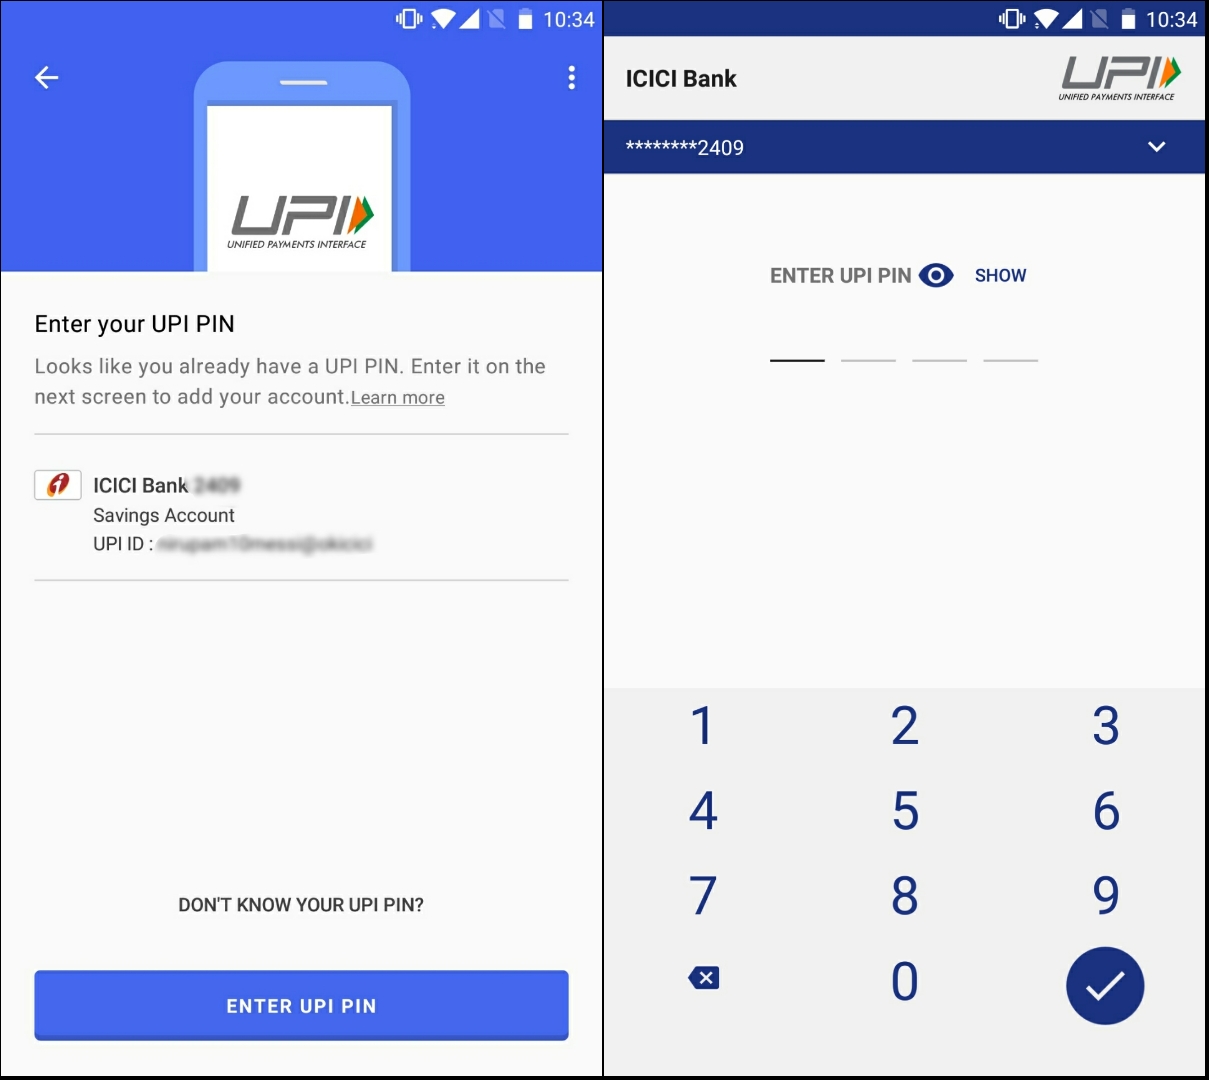
Step 3: Next, the app will ask you to enter your UPI ID. Based on whether you have a UPI ID or not, Step 4 will not differ for both sets of audience.
If you already have a UPI ID
Step 4: If you already have a UPI ID, Tez will ask you to enter the same for verification. Just tap on ‘Enter UPI PIN’, type in your 4-digit PIN and voila your linked bank account will now appear on the app.
If you don’t have a UPI ID
Step 4: Creating a UPI ID is pretty simple with Tez. After you have selected your bank and mobile number in Step 2, tap on ‘Proceed’.
Step 5: It will now ask you to enter your Debit Card details which are linked with your mobile number. Enter your credentials and verify the OTP.
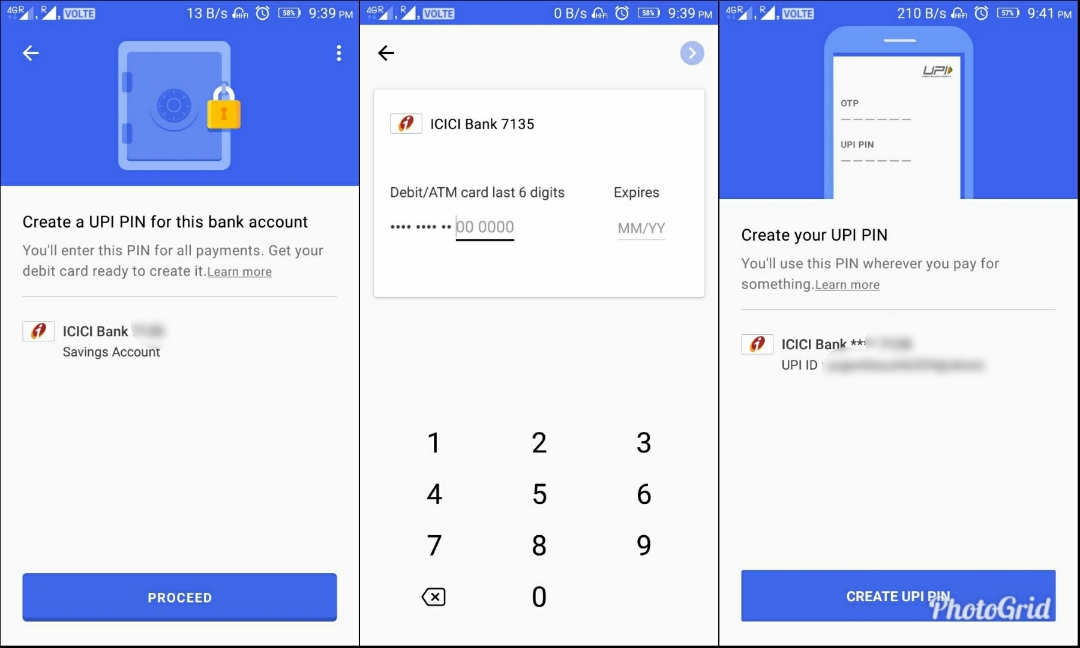
Step 6: Next, you now enter the 4-digit UPI PIN you want to set and once done, we are now ready to transact through Google Tez.
How to make Payments using Google Tez?
There are a bunch of ways through which you can transact with Google Tez. Let’s discuss all of them in detail.
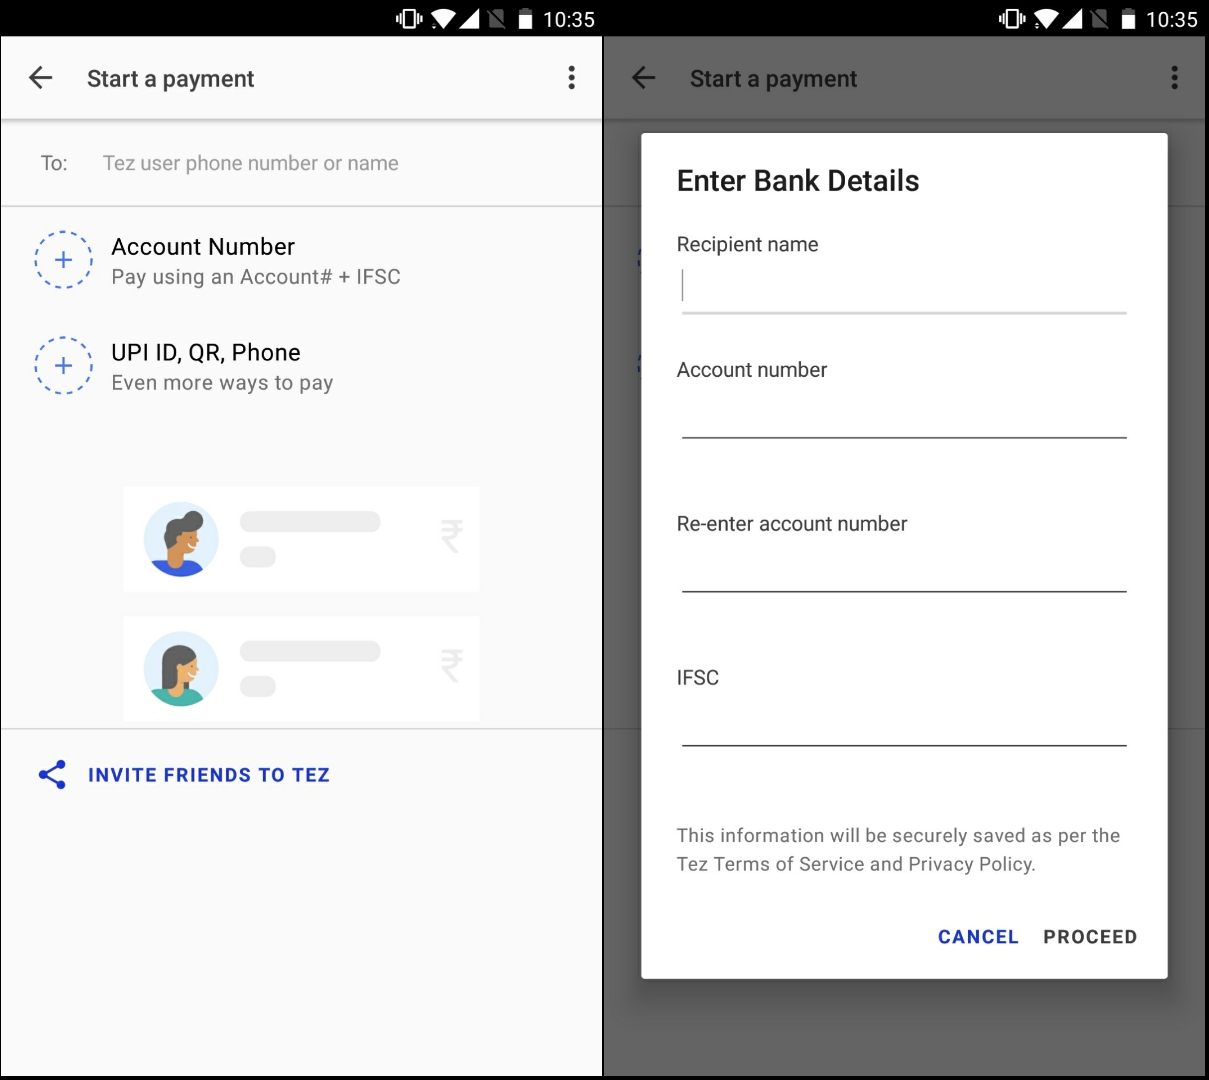
Account Number
This is more of a traditional method of transacting online. Under the Payments section on the main screen, you choose ‘Account Number’. Add the various details like Recipient’s name, Account Number, IFSC Code and you are good to go. This method will come in handy if the recipient is not a Tez user.
After you are done entering the details, just enter the amount you want to send and press proceed. Your bank will ask you your UPI PIN before you can successfully send the money.
UPI ID
Alternatively, you can simply enter the UPI ID of the person you want to send. Then, just enter the amount the procedure is same as the one with an Account Number.
QR Code
If entering UPI ID is still cumbersome for you, Tez also allows you to send money via QR Code. Just scan the QR code of the recipient by going to the QR code option and enter the amount you want to send.
Alternatively, you can simply tap the three dotmenu on the main screen and choose ‘Scan QR Code’. Also, you can get your QR Code from here by tapping ‘Display QR Code’. Note, the recipient needs to be a Google Tez user for this method.
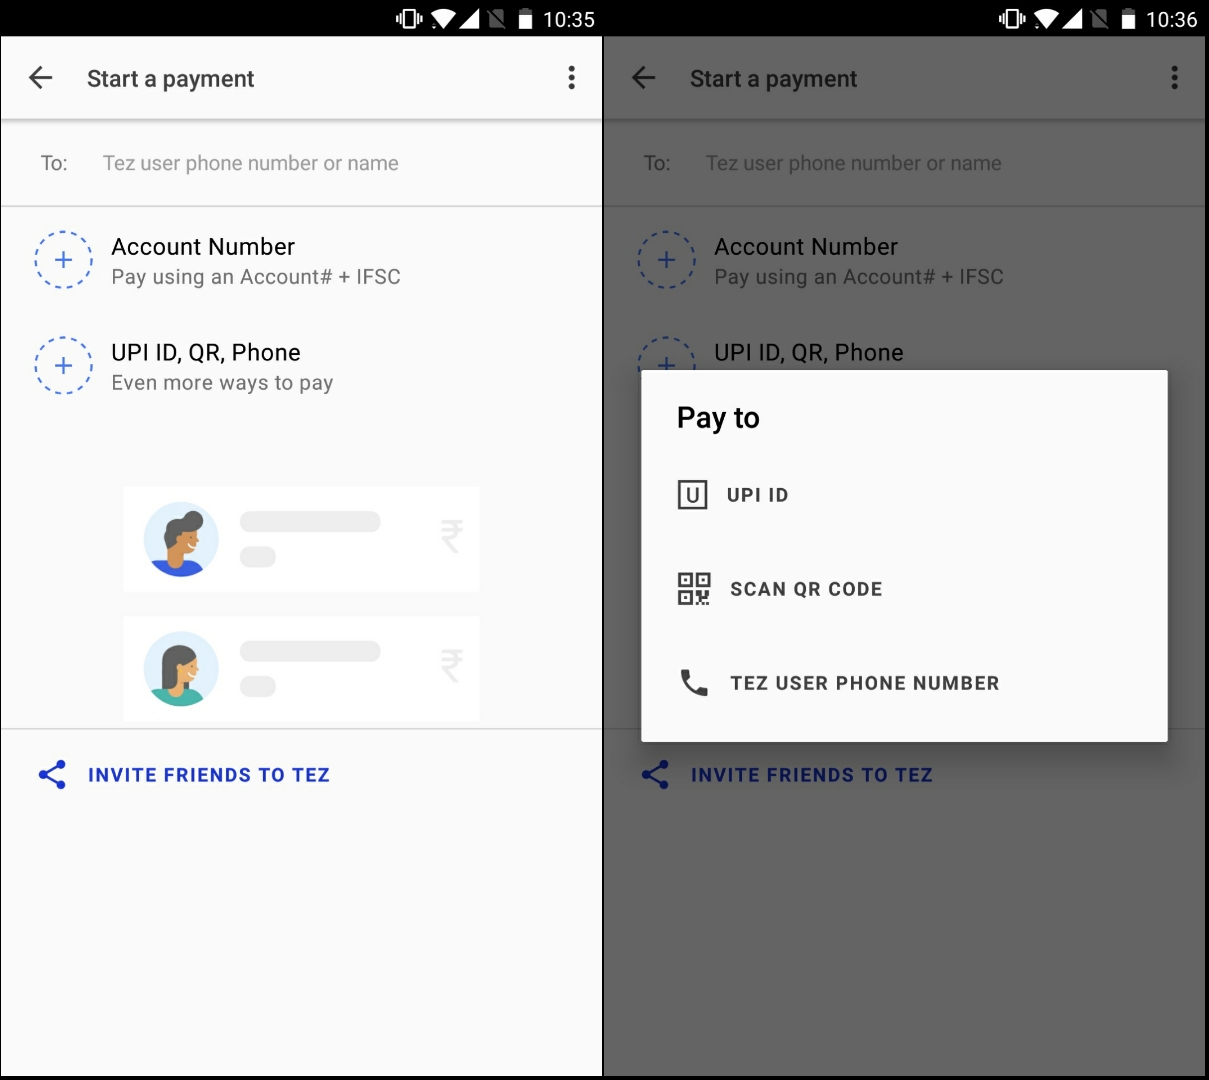
Phone
You can also send and receive money via phone number. However, just like the QR Code – the recipient here needs to have an active Twz account.
Simply enter the phone number of the recipient by choosing the option ‘Tez User Phone Number’ > Enter in the amount you want to send > confirm it via your UPI PIN and that’s it.

Cash Mode
Well, this is something which adds the required pinch of uniqueness in Google Tez.
You might have noticed the Cash Mode which sits right on the main screen of the app. Tapping on it will give you a pop-up window telling how it works.
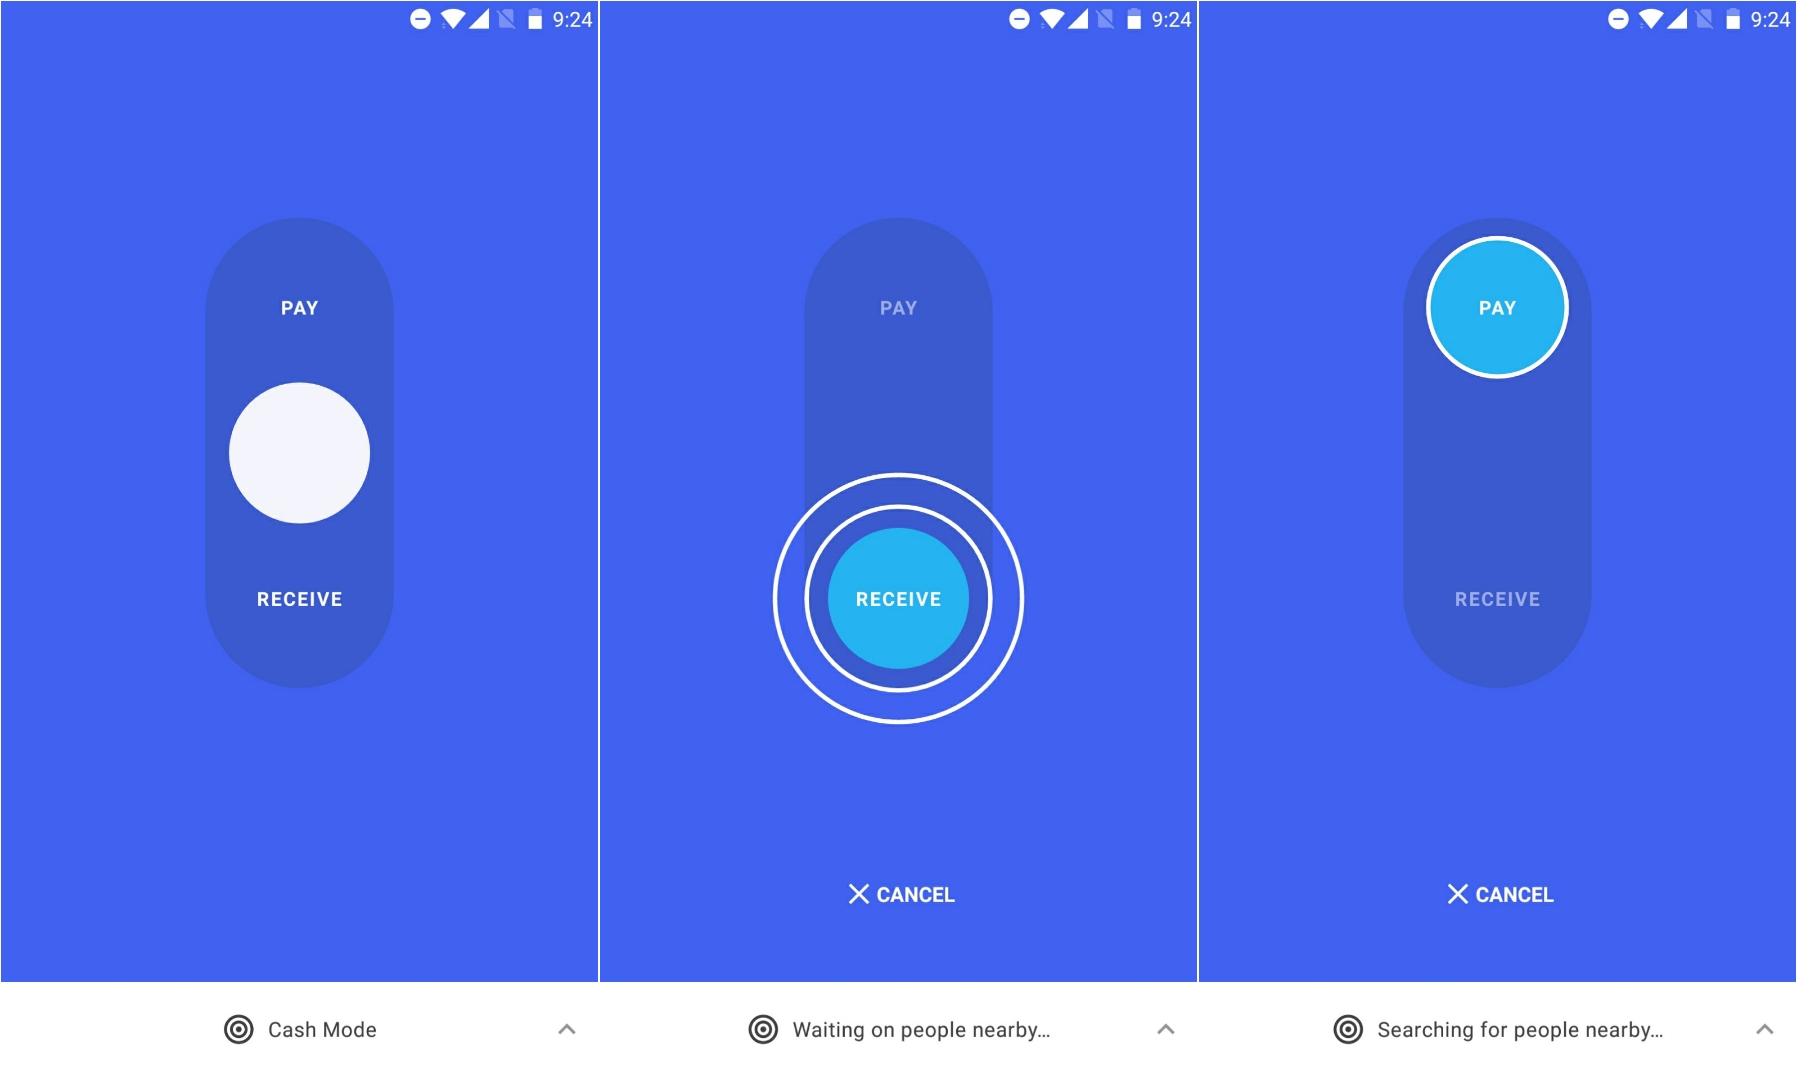
So Google Tez can send and receive money with nearby Tez users through an ultrasonic audio which it generates every time you are inside the Cash Mode menu.
If you want to pay, just drag the Cash Mode Slider to top while if you are on the receiver’s end, you drag it to the bottom. Note – When you drag the toggle to top (In case you are paying), the recipient should drag the toggle down to send the ultra-sonic audio.
Once done, you simply enter the amount and send the money. Yes! It is that simple. Personally, I can see myself using this a lot if most of my friends happen to use Google Tez in future. You don’t need any credentials such as Account Number, Phone Number or any pin. Further, I won’t be surprised if similar apps like Paytm, Chillr brings in this option in future.